Most of my attention the past few weeks have gone to developing Demox however, I’ve managed to put some time on fixing a few things for the Solution Organizer Utility aswell. While not ready to be deployed, these changes will be in place for v0.1.2.0 which will be released sometime within the next few weeks!
New Features
Update Log Generator: By clicking the Project Overview button, and then entering a build/version name that exist in your database you will be able to print an update/change log for your solution. It will collect all work items that you’ve completed for the specified build and output them to a .txt document on your desktop.
Interim Goal Tracker Widget: A newdashboard widget that allow you to specify one of your interim goals that you wish to track from your solution’s dashboard.
Updates
Interim Creation changes: I’ve removed the field “Interim Goal Type” from the Interim Creation dialog since it served no purpose
Item Name Conflicts: Saving an item with a conflicting name will display a dialog to either rename the new item ( eg. <ItemName>, <ItemName>1, <ItemName>2 ) to include a number or to overwrite the existing item
Editor Text Formatting: The item editor now properly hide tags when you’ve finished editing your text. Also, header-tag has been changed from (##) to (<h></h>) and italic-text from ( [ ] ) to ( <i></i> ).
Catalog Migration: From v0.1.2.0 it will be possible to move catalogs within the solution outliner.
Furthermore, a few bugs and glitches have been sorted out:
Fixed issue with the “Manage Widgets” button not opening the Widget Preferences screen
Fixed issue that made dashboard widgets glitch if applied inproperly in the Widgets Preference screen
Missing or removed solutions will no longer be printed in the Recent Files list
Fixed issue with the Solution Outliner not beeing reset when loading a new project/solution
Fixed issue with the Dashboard Statistics field displaying wrong item sums
Fixed issue with the Item Editor not loading “Target Build” for the first item opened after loading a solution
This article is part of the, now deprecated, Demox development log. Demox was cancelled and is no longer in active development so this article can be somewhat out of context- however, I felt some information here could still be of use to someone, therefore it’ll remain for anyone to read.
My previous projects have contained water however, I’ve never put any effort into making it behave like water would. In LBKR for instance the water was purely a decoration, it would not react to objects colliding with it’s surface nor would said objects be manipulated by the water in any way- this made it feel very artificial and, in lack of a better word, un-watery… (Please excuse my word-slaughtering, keep in mind that english is not my native language ;P )
Water Interaction
For Demox I aim to make the water less of an illusion, and have it actually react to collisions and affect objects that enter the “water volume“. This actually involves multiple object behaviours considering the code, and a whole lot of different particle effects among other things.
So what did I actually want to happend when something collides with the water? That depends on what type of object actually hit the water of course, but let’s have a look at the goals I had set in mind.
Volume Collision Goals:
– Corpses, limbs and some types of objects / items should float when in a water volume. – Character’s should have reduced movement speed when moving through water, to simulate a sort of resistance / drag. The speed reduction should depend on the depth of the current position. – Projectiles hitting the water should use water-impact effects instead of their default hit effect. – Everything that enter the volume should visualize it by playing ripple or splash effects. – Water should react to elemental damage effects, ie. extinguish fire, and become electrified by electricity attacks.
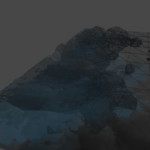
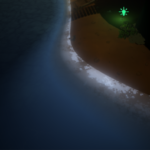
Water impact effect, played when a body hits the water volume.
Starting with the water volume itself, there were some important properties to keep in mind. For starters, the depth of the volume which is required to determine what ripple effect to use, small water puddles would for obvious reasons create smaller splashes than if an object fell into a large pond or river. I simply set this property to be the height of the water volumes bounds, and then adjust the volume size in the editor to fit the terrain or water container. The next property required is the world position along the y-axis that the volume’s surface is located at, this is required when calculating the depth of the volume at a specific location. (Which is done to determine current speed penalty for avatars moving in the volume.)
float vDepth; //Depth of the current water volumefloat vSurfacePoint; //World position along y-axis of the current water volume's surfacefloat speedPenalty; //The velocity reduction of this instanceTransform vSurface; //Current water volume//Water volumes are identified through the OnTriggerEnter method
public void OnTriggerEnter( Collider other ) {
if( target.IsDead || _update || !other.CompareTag( Tags.SurfaceWater )) {
return;
}
vSurface = other.transform; //Assign colliding volume as current water volumetarget.InWater = true; //Flag target avatar as inside a water volume//Determine if the current water surface is deep enough to swim/drown invDepth = MapMaster.Current.FindWaterVolume( vSurface).VolumeDepth;
if( vDepth >= SharedGlobalProps.SwimDepth ) {
ControlledFx splash = GameObjectPool.Current.PullCommonFx( CommonFxNames.W_Impact_Avatar ); //Pull a water-splash effect from the ObjectPool
if( splash != null ) { //Play the water splash effect if foundsplash.FireFxCheap( transform.position );
}
}
StartManagedUpdate(); //Starts a custom Update-methodtarget.RefreshMoveSpeed(); //Refresh move speed of the avatar
}
//Only viewing a fraction of the OnManagedUpdate method since alot of it's content is irrelevant for this post
public void OnManagedUpdate() {
....
if( Time.time - _lastDepth >= _DepthThreshold ) {
CalculateWaterDrag(); //Update the depth drag applied to the avatar at regular intervals ( ie. move speed penalty )_lastDepth = Time.time;
}
if( vDepth >= SharedGlobalProperties.SwimDepth && !target.CanSwim ) {
if( _curFx == null ) {
RetrieveFx(); //Pull an appropriate FX from the Object Poolreturn;
}
//Play the FX at the avatars position, but lock y-axis position to the surface pointVector3 pos = new Vector3( transform.position.x, vSurfacePoint, transform.position.z );
_curFx.transform.SetPositionAndRotation( pos, transform.rotation );
if( !_drowning ) {
_drowning = true;
_lastDrowned = Time.time;
}
target.OnDrown();
return;
}
....
}
public void CalculateWaterDrag() {
//Determine how far beneath the surface the avatar currently is locatedVector3 xzSurf = new Vector3( transform.position.x, vSurfacePoint, transform.position.z );
float avDist = Vector3.Distance( transform.position, xzSurf );
//Assign current drag / speed penaltyspeedPenalty = ( avDist / vDepth ) * _DepthDragMultiplier;
}
As you can see I simply determine the penalty by calculating how far along the way to the bottom of the volume the avatar has reached. Since this return a value in the range from 0 to 1 I also multiply it by a constant value “DepthDragMultiplier“, in order to get a value suitable for actual speed reduction.
As can be seen in the code, the depth will also determine what type of water ripple effects to play while the avatar is moving around. This also ensures that the correct effect is played if the terrain under the water is sloped and the character is moving from deep to shallow waters or vice verca.
///<summary>
/// Retrieves a water-ripple FX from the object pool and starts playback
///</summary>private voidRetrieveFx(){
ControlledFx fx = null;
//Select appropriate particle system if(vDepth <_SmallRipplesDepth ){//Play a smaller style of ripple effectfx = GameObjectPool.Current.PullCommonFx(CommonFxNames.W_PuddleRipples );
}
else if(vDepth< SharedGlobalProperties.SwimDepth ){ //Play common water ripples effectfx = GameObjectPool.Current.PullCommonFx(CommonFxNames.W_Ripples );
}
else{
if(target.CanSwim ){//Play ripples effect of type "SwimRipples"fx = GameObjectPool.Current.PullCommonFx(CommonFxNames.W_SwimRipples );
}
else{//Play ripple effect of type "DrownRipples"fx = GameObjectPool.Current.PullCommonFx(CommonFxNames.W_DrownRipples );
}
}
if(fx == null ){
Debug.LogWarning("WaterTracker could not retrieve a VFX");
StopManagedUpdate();
return;
}
_curFx = fx; //Cache the located effect_curFx.FireFxCheap(); //Play the located effect}
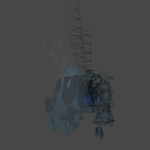
Water ripple effects in actionCommon Water Ripple effect
For ripple and water trail effects there are constant depth values as limits of when to select each type of effect, and each effect has three base variations. There are more variations aswell but for other purposes, such as larger objects or projectiles hitting the surface etc.
What impact / splash effect to use when a collision with the surface occur is determined within the water volume’s code, unlike the ripple effects as described above. It’s a really simple setup of checking the tag of the object hitting the surface, for now this works nice since most objects with the same tag are of similar sizes (ie. characters, items, etc). I already know now that some monsters will be alot larger than average though so in the near future I’ll need to adjust this to scale the splash effect to look good if the large monsters fall in the water aswell.
Buoyancy
One of the most important things in my own opinion are that bodies and some objects should float in water, as they do in reality. I don’t think I’ll go into detail of exactly how this is done since I’m quite certain there are a whole lot of information to gather on the subject out there in Google-land, but to cover some basics- everything that floats will require multiple properties to determine their behaviour in water.
First, the buoyancy of the object, how well does it float in water? Each object also required values to limit their movement in the water volume, my first iteration of the floating behaviour had the objects jump out of the water over and over again, as if displaying their acrobatic grace- to adress this issue I added two limiters / thresholds. “Float Pivot“, and “Surface Range“, the float pivot is a Vector3 that describes a point relative to the object’s position that symbolizes the most buoyant part, eg. objects that contain air compartments tend to be most buoyant in the compartment where the air is located.
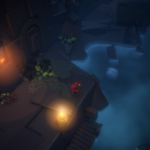
Dead body and limb floating in water
The surface range will be used to compare how much beneath or above the surface the object is and adapt force applied in an appropriate manner.
I also added a property of “water drag“, this property is modified by the current submergence of the object and the end product will be used to manipulate the power of the force or gravity applied to the Rigidbody of the object, objects in water usually have alot more velocity if floating up from the bottom but when at the surface the velocity is no longer as agressive- this was the behaviour that I intended to simulate with the help of this property.
Additionally, a reference to the water volume affecting the object was also required since the depth at the object’s position is compared alot.
Moving Water
While creating effects for the water system, one of the assets created was a waterfall- it looked really stupid though to have a waterfall but when looking at the source, or volume from which the water came from there was no movement. For obvious reasons I decided to create some assets for moving water. This could be achieved by writing a shader to handle I guess, but for example, rivers or streams can often bend and turn alot, and I don’t know how to make a really adaptable shader for this so I decided to try using particle systems for the moving water instead. I’ve only created a prototype effect this far but I like the result, with some more experimenting it could turn out quite nice I believe.
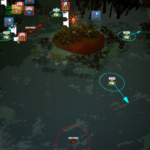
Bodies and objects beeing swept away by a river, using ‘Constant Force‘-triggers
The particles are rendered as simple 3D meshes instead of 2D billboards, and currently use Unity’s refractive water material. As I liked the style of this effect I modified all other water effects to use a similar technique.
But back on track, the moving water presented an obstacle that I hadn’t thought of, objects floating in the water volume would not follow the water flow, but instead just float near the same position. This was easily fixed though by creating triggers that apply constant force to objects within it’s bounds if those objects are in a floating state, and then positioning those triggers along the water’s path.
Example of the ConstantForce script can be seen below:
public Vector3 forceDir; //Direction of the force, relative to this object's rotation
public float force; //Power of the force applied
private List< Rigidbody > _bodies; //List to hold all updated rigidbodies
public void OnTriggerExit( Collider other ) {
if( (other.CompareTag( Tags.Corpse ) || other.CompareTag( Tags.Item )) && _bodies.Contains( other.attachedRigidbody )) {
//Remove the target from the list of updated bodies_bodies.Remove( other.attachedRigidbody );
}
}
public void OnTriggerEnter( Collider other ) {
if( (other.CompareTag( Tags.Corpse ) || other.CompareTag( Tags.Item )) && !_bodies.Contains( other.attachedRigidbody )) {
//Add the target to the list of updated bodies if it has correct object tag_bodies.Add( other.attachedRigidbody );
}
}
public void FixedUpdate() {
if( _bodies.Count == 0 ) {
return;
}
for( int i = 0; i < _bodies.Count; i++ ) {
if( _bodies[i ]!= null ) {
_bodies[ i ].AddForce( transform.TransformDirection( forceDir ) * force, ForceMode.Force );
}
}
}
( Pictures above are the final result of water volumes after a custom shader was written for water surfaces)
Swimming
Among the final touches for the water interactions I made it possible for characters to swim in deep water, I were able to make use of alot of the code I had already written for the other aspects concerning water interaction behaviour, only some minor adjustments and tweaks had to be made to implement it for the character classes. I did consider some possible obstacles before putting it all together though.
Obstacles
– How to determine when a character is swimming and when simply walking in shallow water? Water volumes will rarely have flat bottoms so depth will differ within the same volume. – How to stop the player from swimming out of the map in cases where the map borders consist of ocean? – How to get the player out of the water if no ramp or beach is within the volume’s bounds?
The first obstacle was easy (actually, all obstacles were easy to solve…) to sort out by using a similar technique to what I did for retrieving FX as included in a code snippet earlier in this post.
float submergence = vSurfacePoint - transform.position.y;  //Determine how deep beneath surface avatar is
if( submergence >= SharedGlobalProperties.SwimDepth ) {}   //Do some stuff
If the avatar is a defined distance beneath the surface I can thereby either flag the avatar as swimming, or if not able to swim have the avatar drown from within the if() block.
To stop the player from swimming into infinity, or reaching areas far away that were not intended to reach I added a stamina vital to the player character’s statistics. While swimming the stamina will drain and when out of stamina the avatar will drown. This obviously help when limiting the player’s swim range.
Since the avatar is not allowed to jump when swimming, it was critical to find a way to leave water volumes if there were no ramps or shallow water within the volume that would allow the avatar to start walking on the bottom of the water volume. I’m making use of the code for mounting obstacles while not in water, by casting a ray in front of the player I can detect if there are any climbable geometry, and if so allow the player to mount said geometry and leave the volume by climbing.
Swimming behaviour in-game
An obstacle I had not anticipated were with floating platforms, as the player jumped or climbed on them they would not make any motion at all, this made it look like they were actually static objects just positioned above a water volume. I weren’t satisfied with this.
I made a quite simple work-around for this issue by attaching a trigger volume to the floating platform objects, when the trigger is activated by player motion a force impulse will be sent to the rigidbody component of the floating platform, making it move.
In the previous post I wrote regarding SolOTility I mentioned that I expected to be able to release a beta-ish-version of this program within a week’s time. Needless to say I misjudged the time estimate, alot of time this week has been spent working on Demox, and on top of that I found some bugs in SolOTility that needed to be fixed before releasing the first version aswell as some new features that were added!
Appending Images to Work Items
I’ve added functionality to append images to work items within the user’s solution. It can be either added manually by writing the filepath to the image within tags ( eg.<img>C:\Program\SomeDir\myImg.png</img>) or by clicking the “Add Image” button in the Item Editor, which will auto-generate the previous code.
There’s also been alot of fixes for the Item Editor, most in order to make it a little more user-friendly and help the user avoid making wrong decisions by mistake. (Such as closing items without saving changes, etc. )
The new appearance of Solution Catalogs and Items in the Item List
Solution Interim Goals
I added a feature to allow the user to set up their own interim goals, it’ll be useful in cases if the user would like to keep track of progress of the project, a specific build or of a group of work items.
It’s a quite simple system, the interim goals are set up to compare the amount of closed items ( completed, obsolete & deprecated ) against other items ( inactive, active, prioritized ). When all specified items are closed the interim goal is completed.
The user can currently set up interim goals to either track items with a specific build name or items with a specific item tag.
Example of an image appended to a work item’s content.
Work item control’s appearance has been updated to make it easier to identify item type, and the catalogs shown in the Solution Outliner panel are now color-coded aswell. The Dashboard is colored red, Navigator nodes are colored blue and common catalogs use one of four available green colors. ( The green color is shifted depending on at what level within the catalog node tree a catalog is placed. )
Another minor change, Mindmap Editor is opened in Full-screen mode.The Project Overview screen, displaying all user-created interim goals and solution progress.
Last but not least, another widget was added called “Message Board”. The message board will display the most recent messages or comments that have been left in an item, the idea is to have these messages act as a reminder.
All that remains before I upload a beta release now is to figure out how to create a setup / installer file. I’ve created such files before but all of them have been sort of broken in one way or the other, so this time I was thinking that I probably should do some research and get things right for once .__.’
And before we part ways, don’t forget to follow me on @Twitter for more news, artwork and whatnot!